Step-by-Step TNREGINET EC Download Guide Latest Update (2026)
Downloading your Encumbrance Certificate (EC) from TNREGINET may seem tricky at first, but following a step-by-step approach makes it fast, simple, and accurate. This guide will help you access and download ECs for legal, banking, or personal verification purposes.
What You Need Before Downloading
Before starting, ensure you have:
Property details: survey number, plot number, owner name.
Sub-Registrar Office (SRO) details for the property.
TNREGINET account login (recommended for certified ECs).
Internet connection and a desktop browser for smoother experience.
Tip: Guest access can be used for preliminary checks but cannot generate digitally signed certified ECs.
You can also read: Property Price vs Guideline Value Explained Update (2026)
Step-by-Step TNREGINET EC Download (2026)
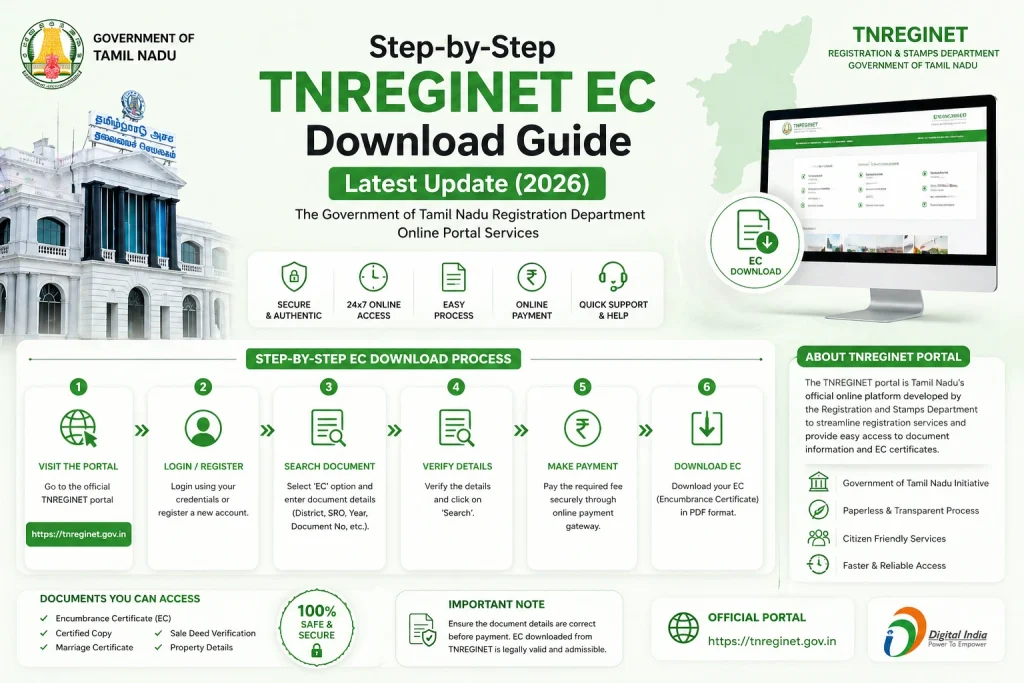
Step 1: Visit the TNREGINET Portal
Open your browser and go to the official TNREGINET website.
Choose Login if you have an account; otherwise, you can use Guest Access for limited searches.
Tip: For first-time users, registering ensures you can download certified ECs and track requests.
Step 2: Select Encumbrance Certificate Option
Navigate to the Encumbrance Certificate (EC) section on the portal.
Choose the search type:
Survey Number
Document Number
Plot/Flat Number
Tip: Always choose the method that corresponds with the details you have.
Step 3: Enter Property Details
Fill in the survey number or document number accurately.
Enter owner name if required.
Select the Sub-Registrar Office (SRO) where the property is registered.
Choose the date range for which you need the EC.
Tip: Wider date ranges help cover multiple transactions, especially for old properties.
Step 4: Solve Captcha and Search
Enter the captcha code displayed on the screen.
Click Search/Submit.
Tip: If captcha fails, refresh the page or try a different browser. Desktop browsers usually work best.
Step 5: Review EC Details
The portal will display a list of registered transactions.
Check all details carefully:
Owner name
Survey or plot number
Transaction dates
Document numbers
Tip: Any errors at this stage can make your EC invalid for bank or legal use.
Step 6: Download the EC
Click Download PDF to save the EC.
Make sure it shows a digital signature or certification.
Save in a secure location on your computer.
Tip: Keep multiple copies — one for personal records and one for submission to banks or legal authorities.
Step 7: Optional – Track Request Status
ied EC:
- Navigate to EC Request Status in your login account.
- Enter the request ID or property details.
- Monitor status updates until approval.
Tip: This ensures you know exactly when your certified EC is ready for download.
- आप जानकारी डाउनलोड भी कर सकते हैं, अगर आक इसकी जरूरत हो।
Common Issues and How to Fix Them
EC Not Showing:
Check survey number, SRO, and date range.
Captcha Errors:
Refresh page or switch browsers.
Missing Transactions:
Use a wider date range or visit the SRO for older records.
Digital Signature Missing:
Always download via login account to get certified ECs.
FAQs
Final Words
Downloading an EC from TNREGINET is straightforward if you follow these steps carefully. Always ensure your property details are correct, date range is appropriate, and the EC is digitally signed. Keeping multiple copies and checking the certificate before submission will prevent delays in property transactions, bank approvals, and legal processes.